Tools
Field AV Lab
Field AV Lab is an electronics prototyping system geared towards circuit education and rapid prototyping for AV performance circuits. It has two 3.5mm IO, a dedicated headphone amplifier/audio output and VGA input/output for CHA/V style VGA video hacking. There are on board potentiometers, a light sensitive resistor and two LEDS for visualizing LFOs and general sanity checks. It is meant to pick up where the now discontinued Om Synth left off.
This design is a collaboration between Wavefield ( https://www.wavefield.media ) and Jen Kutler ( https://www.jenkutler.com ) based on the Om Synth by Peter Edwards of Casper Electronics ( https://www.casperelectronics.com ) combined with the CHA/V by Jonas Bers ( https://www.jonasbers.com ) PCB Artwork by Paloma Kop ( https://www.palomakop.tv ).
Instructional videos for the Om Synth and 'recipes' translate to this board e.g.
https://www.youtube.com/watch?v=FaoJaLmZaL4
https://www.youtube.com/watch?v=t7JYOIYqMEY
https://www.youtube.com/watch?v=ECSYLTB_sbw
It also offers a lower cost point of entry than the LABOR but can be used practically in the same way for instructional videos like these:
https://www.youtube.com/watch?v=Xbl1xwFR3eg
Design files and BOM are available at https://www.github.com/theotherjenkutler/Field-AV-Lab/
The first RGB Color Wobbulator

This is a three tube color version of the wobbulator, based on the original Raster Manipulation Unit by Nam Jun Paik. Constructed from an old cathode ray tube projector, it has nine signal channels to cover the vertical, horizontal and “S” coil for each tube.

sewing machines
Using Teensy MCUs and stepper motors, these machines can play notes, rhythms and harmonize with each other via MIDI control. Each one has a guitar or bass pickup on the motor to process and amplify the sound. The video above is a test video featuring two sewing machines with delay and reverb accompanied by a drum machine.
Microphones

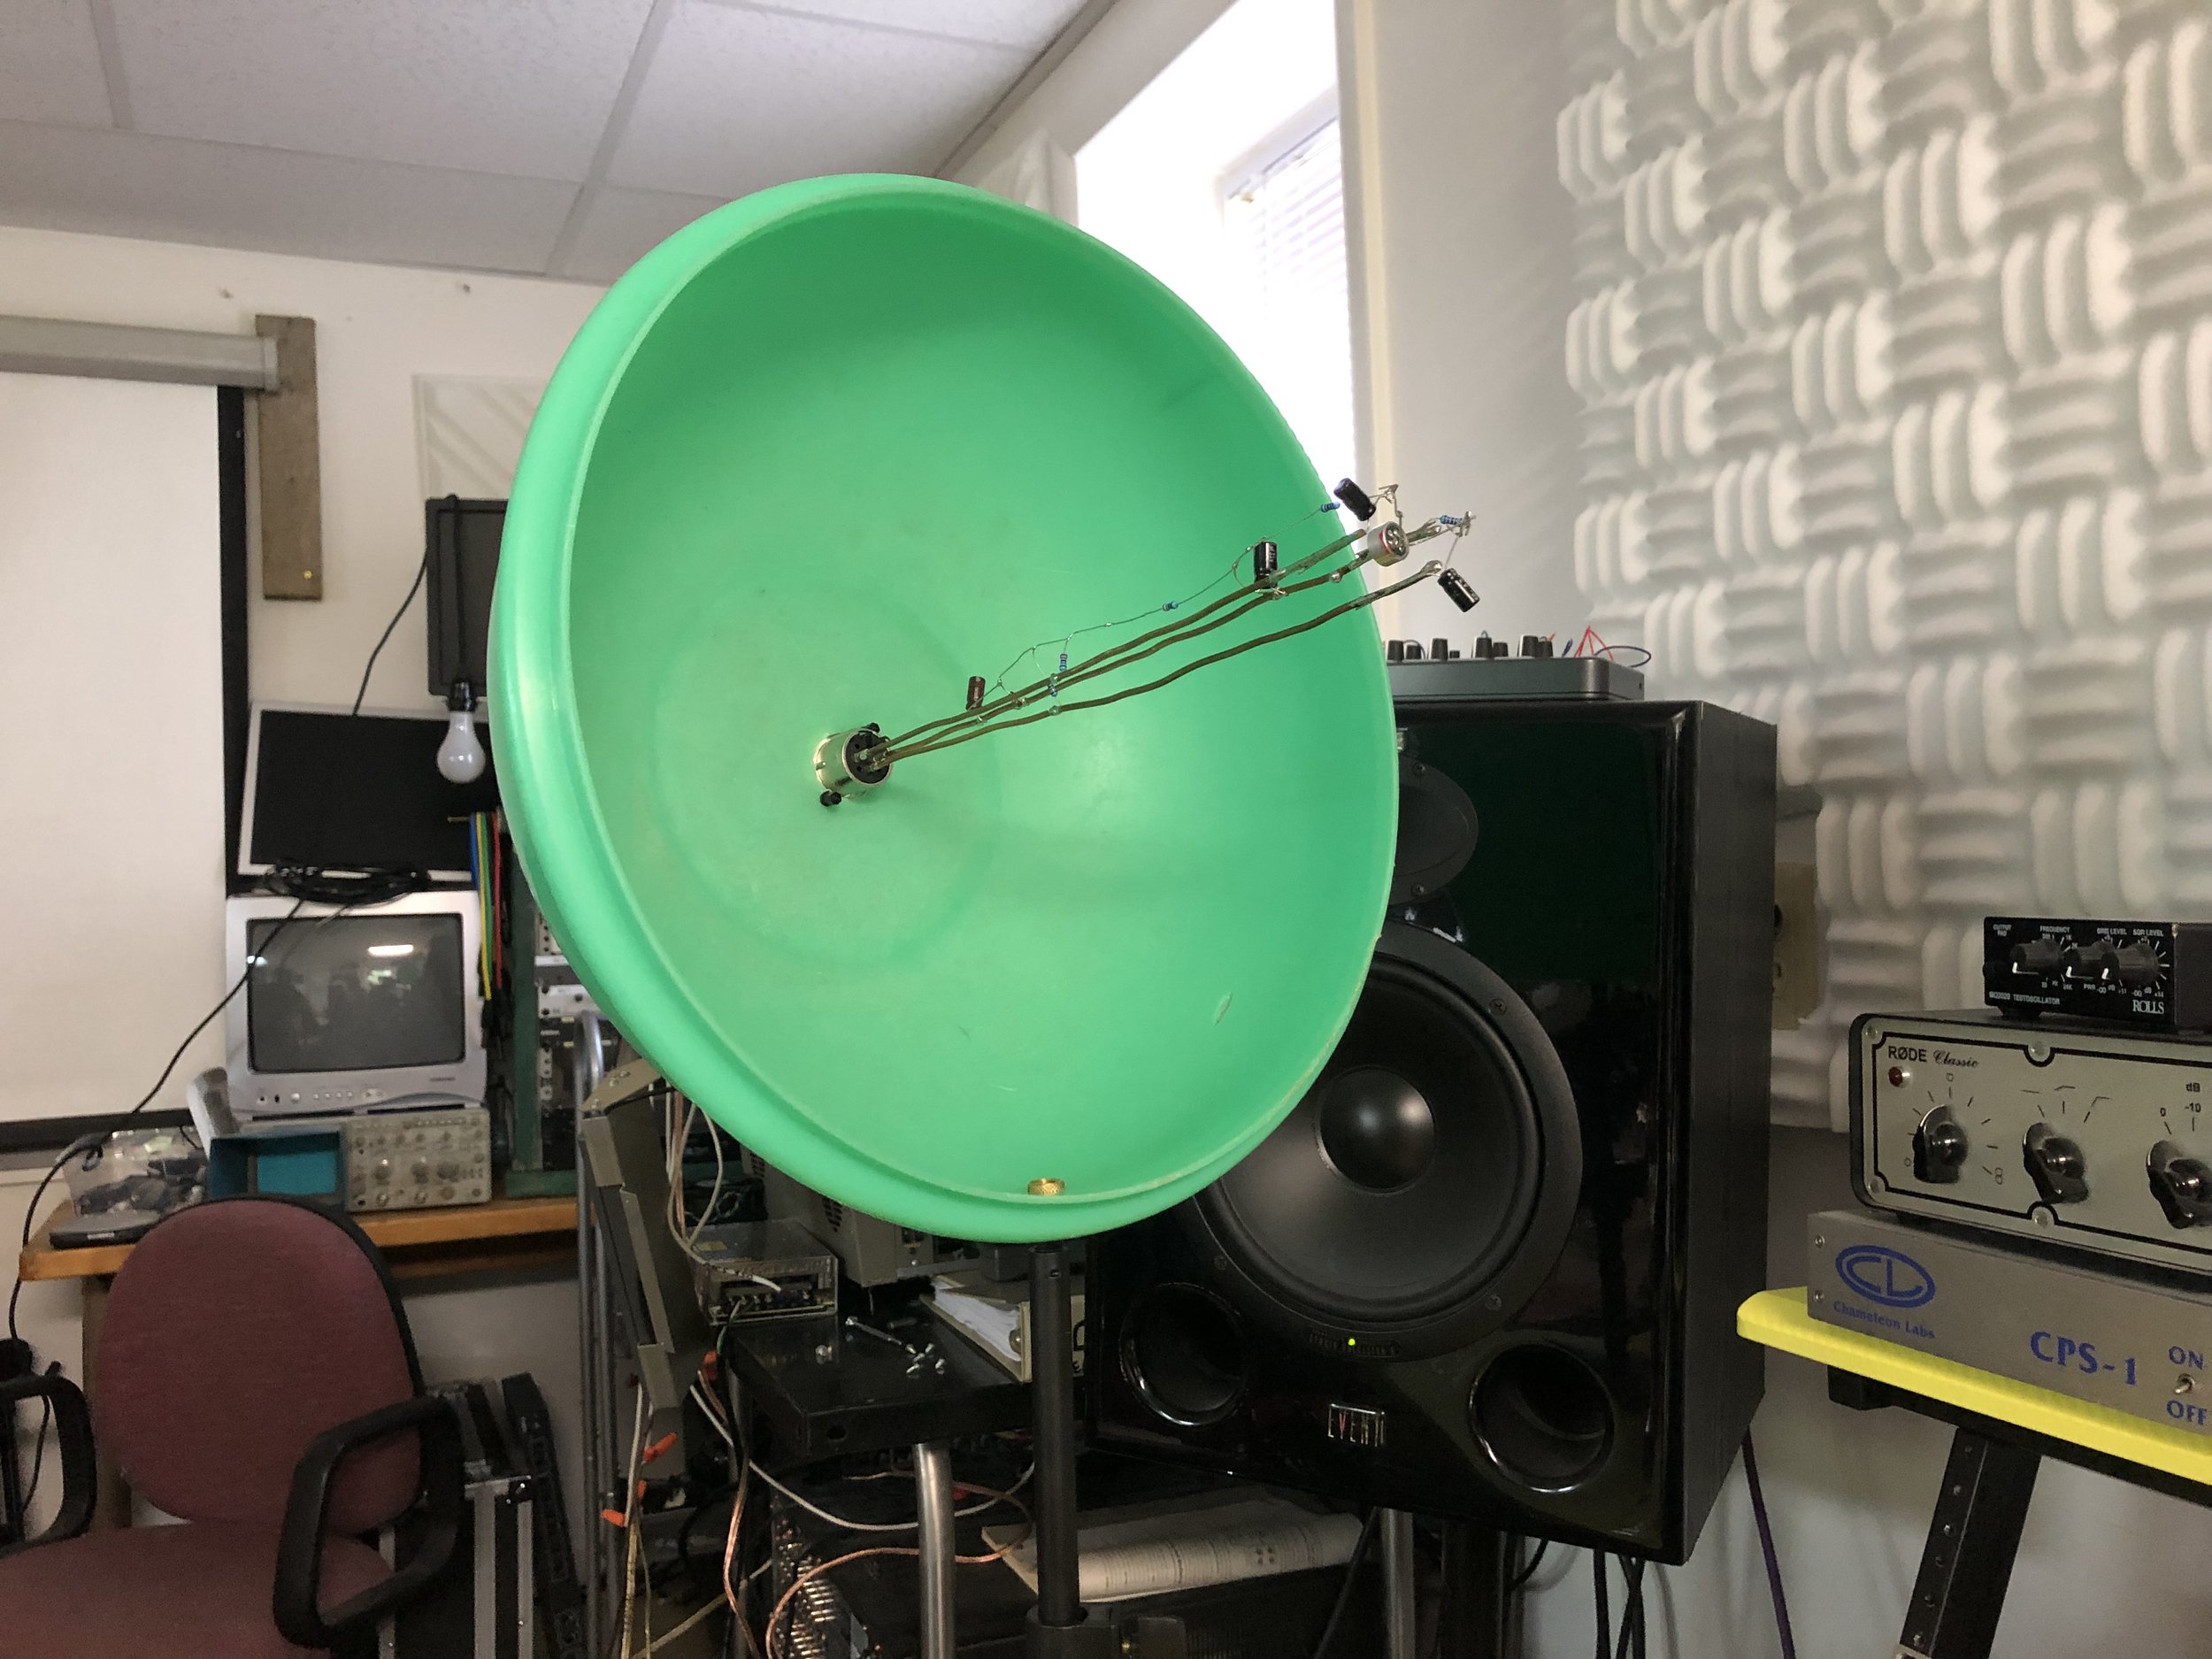
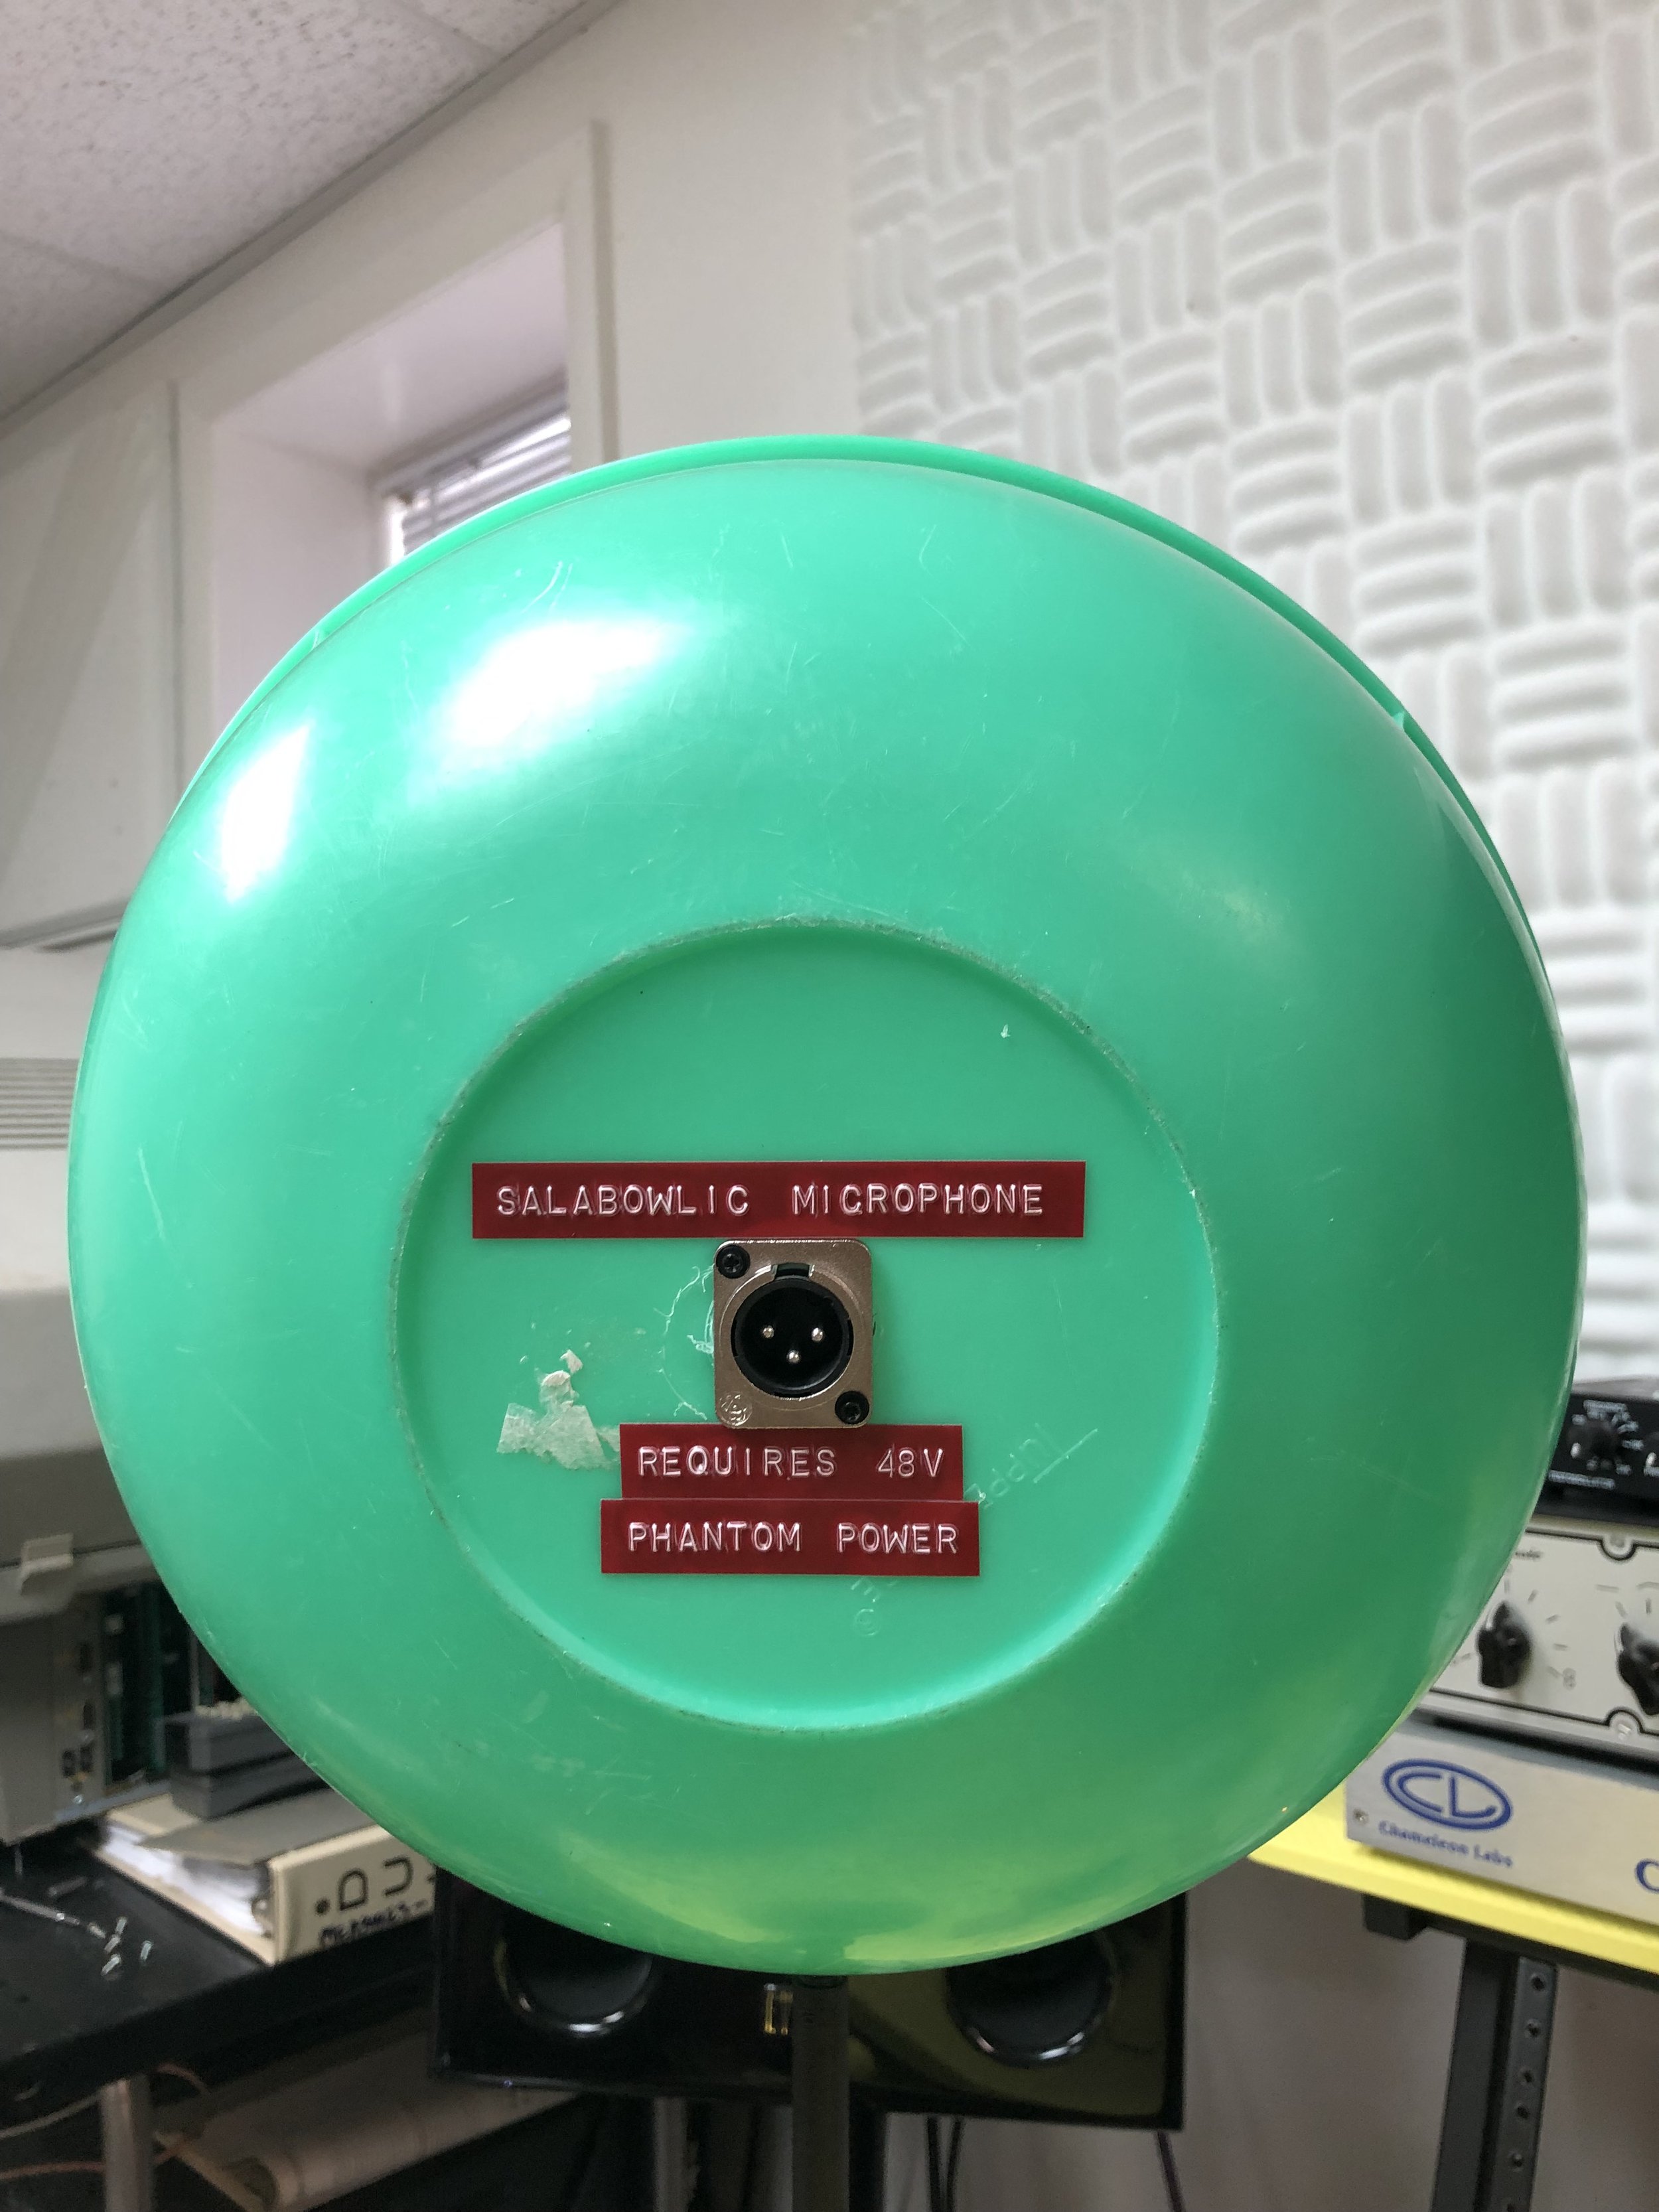
Salad bowl based parabolic mic
Waterproof microphone for field recording in rain and snow
These are now available for sale in my shop…
Handmade ribbon microphone with 3D printed frame. You can download the STL files here.
bowed bed // spring reverb

This is an old spring mattress which can be bowed or used with transducers for unusual reverb. In the photo, the springs are being amplified up by the guitar pickups in a repurposed stratocaster pickguard.
rf
diy 950MHz pyramid horn antenna for microwave auditory effect experiments
Ultrasonic amplifier and speaker system for performance
pure data abstractions for data sonification
My data sonification projects typically have incoming data from an analog to digital converter (usually a low impedance signal going into a 12-bit analog Teensy input). From there, depending on the precision required, the signal will be scaled or left in tact. For applications that are not precision dependent, the original value between 0 and 2046 is scaled to a number between 0 and 127 and converted to a MIDI CC Value. Each change in the signal will trigger a MIDI CC value change over USB. Messages can be staggered to prevent flooding.
In these cases, the MIDI CC messages are able to be used off the bat in a typical DAW. This is fine if you’re interested only in controlling the parameters, knobs and faders within your piece. If you would like Note On and Note Off messages to be generated to produce melodies, harmonies and rhythms, then you would need something translate these MIDI CC messages into Note On and Note Off messages. These abstractions are designed to receive numbers between 0-127 and turn them into Note On and Note Off messages within a standard major or minor scale and then create a MIDI note. Then you can set up a virtual MIDI driver to get these messages into your DAW, or any other application that can receive MIDI data. The example abstraction produces notes within the C major/A minor scales.

In addition to the note, the velocity and note duration need to be determined. Sometimes, there is only one stream of data and it is necessary to extract these values from the same signal that determines the note. In these cases, there are a number of methods. One that I use often is determining the note length by the distance between the previous signal value and the current signal value. In other words, if there is a leap in the signal value, the note duration is shorter whereas if there is a similar value as the last value, it has a longer duration. The example note making abstraction uses this method to determine the note duration from a single stream of data. The note’s velocity is controlled by rate of new changes. When there are many changes in a short amount of time, the velocity is higher and when there are fewer changes, the velocity is lower.

For creating MIDI notes from CSV (comma separated values) files, there is a slightly different approach with the same fundamental principles.
The patch on the right is a very basic example of a general approach. The object [textfile] can open a csv file as long as you replace the .csv extension with .txt. The delay for the [drip] will control how fast your data flows from the csv file into MIDI notes so this will depend on the sample rate of the data in your csv file if you would like the sonification to happen in the same time frame as the data was originally sampled.
The [expr] object will scale your data into a range that is acceptable for MIDI (0-127). Just set the inMin and inMax values to the minimum and maximum values of your input data respectively.
The pitch of the note produced will correspond in this example directly to the input value. Set your preferred note velocity (must be greater than 0) and your note length in milliseconds.
The [ctlout] object will output a MIDI control change message on control channel 1, MIDI channel 1 also corresponding directly to the input data value.
More abstractions to come. Download the current abstractions here.
Thank You For Listening PCB Docs
Documents to build your own vibrator synthesizer and sound transducer (based on Line).
The circuit and components:
(1) 10uF Electrolytic Capacitor
(1) 1N4148 Diode
(1) 10Kohm Resistor
(1) TIP120 Darlington Transistor
(1) TS Audio Connector
(1) Standard 3V Vibrator
(1) Standard USB A Connector w/ USB wall charger or standard 5V Power Supply
What does it do?
How do I assemble it?
Start by putting the components into the PCB board. Make sure that the polarity of the capacitor and diode are correct. Once the components are soldered into place, connect the tip of the audio connector to the IN+ pad and the ring of the audio connector to the IN- pad. Solder a wire to the negative terminal of the vibrator motor and connect it to the M- pad. Then solder a wire from the positive terminal of the vibrator (see drawing) and solder the other end to the M+ pad on the PCB. Finally, connect your power source, +5v to the +5v pad and ground to the negative terminal of the power supply respectively. If you are using a USB cable to power the motor, strip the jacket of the USB cable and clip the white and green wires. Connect the red wire to the 5v pad and the black wire to the ground pad. Be sure to send a hot headphone amplified signal into the audio input. Low volume line level signals will be audible but will not be enough to turn the motor.
What do I use to amplify the signal?
A standard electromagnetic guitar or bass pickup within a close proximity to the vibrator will pickup the sound as though it were a guitar or bass string. You can run the signal through guitar/bass effects and into a standard guitar or bass amp.
More PCBs will be available for order soon.
circuit bending
todo
